For sheer installation ease, wireless video doorbells generally win, especially for DIYers without existing doorbell wiring. They bypass electrical work, requiring only mounting and Wi-Fi setup. Wired models offer superior reliability and features but demand more intricate electrical integration.
Understanding Wired vs. Wireless Video Doorbells in 2026
The choice between a wired and wireless video doorbell significantly impacts installation complexity, performance, and long-term maintenance. As smart home technology evolves, so do the capabilities and installation demands of these essential security devices. Understanding their fundamental differences is crucial for a smooth setup.
What are the Core Differences Between Wired and Wireless Video Doorbells?
The primary distinction lies in their power source and data transmission. Wired video doorbells draw continuous power from your home’s existing doorbell wiring, typically 16-24VAC. This constant power enables advanced features like 24/7 continuous recording, faster response times, and often higher-resolution streaming without battery concerns. Data transmission is exclusively via Wi-Fi for both types, but the consistent power of wired units supports more robust Wi-Fi chipsets and less power-saving compromises.
Wireless video doorbells, conversely, operate on an internal rechargeable battery. This eliminates the need for existing wiring, making them incredibly versatile for homes without a traditional doorbell or for renters. They connect to your home Wi-Fi network for data transmission and rely on motion detection or button presses to “wake up” and record. Battery life varies significantly, from a few weeks to several months, depending on usage and model, such as the Ring Battery Video Doorbell Plus or the Google Nest Doorbell (battery).
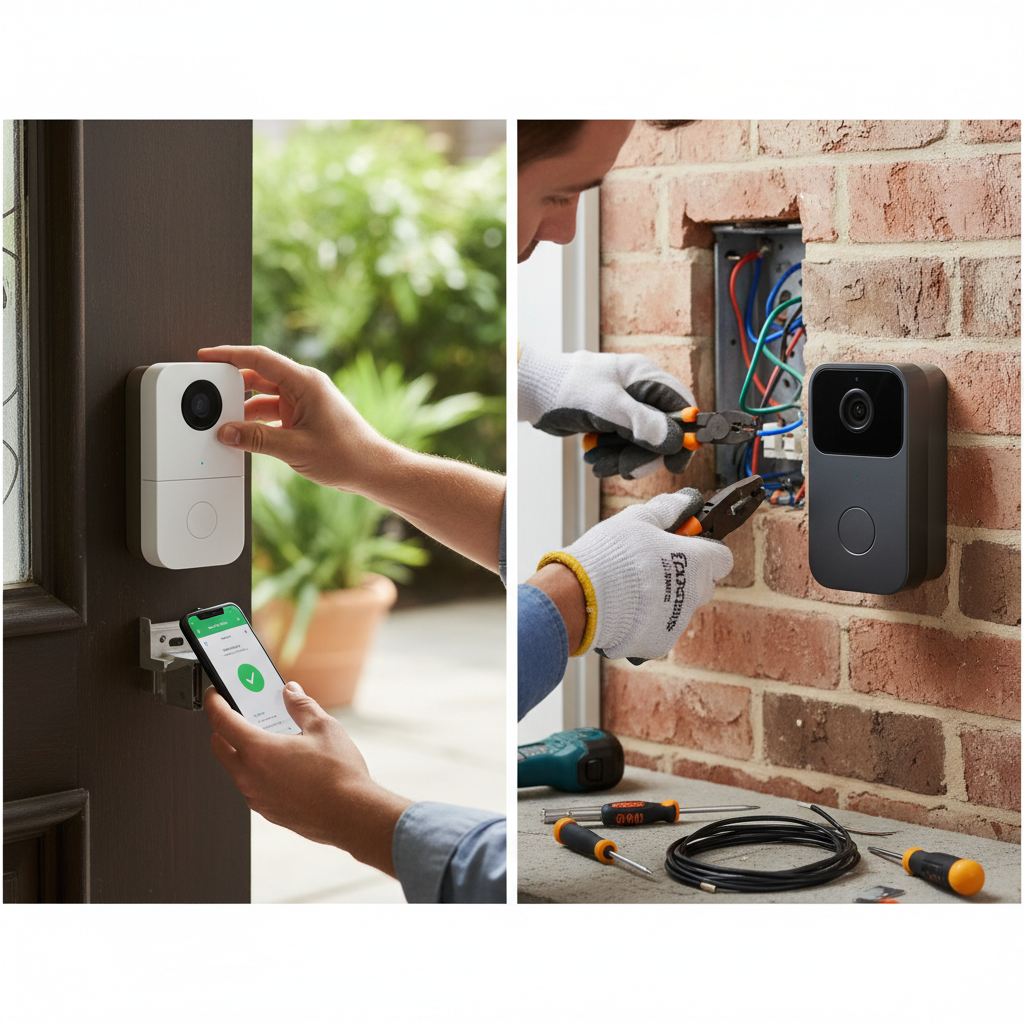
How Easy is Wired Video Doorbell Installation in 2026?
Wired video doorbell installation, while not inherently difficult for someone comfortable with basic electrical work, is generally more involved than its wireless counterpart. The core requirement is existing low-voltage doorbell wiring at your desired installation location. Without this, professional installation or significant DIY electrical work becomes necessary.
The Wired Installation Process: Step-by-Step
|
Our Picks for the Best Video doorbell in 2026
As an Amazon Associate I earn from qualifying purchases.
|
||
| Num | Product | Action |
|---|---|---|
| 1 | Tapo 2K Wireless Smart Video Doorbell with Chime - 160° Ultra-Wide View,Person Detection, Ring Call, 2-Way Audio, Subscription-Free Local Storage/Optional Cloud, Motion Only Alert, D210 |

|
| 2 | Ring Battery Doorbell, Home or business security with Head-to-Toe video, Live View with Two-Way Talk, and Motion Detection & Alerts, Venetian Bronze |
|
| 3 | eufy Security Video Doorbell, No Subscription, Dual Cameras, 2K FHD,Head-to-Toe View, Doorbell Camera Wireless & Wired, Color Night Vision, Two-Way Talk, AI Motion/Package Detection, Built-in 8GB |
|
| 4 | Blink Video Doorbell (newest model) – Head-to-toe HD view, two-year battery life, and simple setup. Required Sync Module not included – Add-On (Black) |
|
| 5 | Ring Battery Doorbell, Home or business security with Head-to-Toe video, Live View with Two-Way Talk, and Motion Detection & Alerts, Satin Nickel |
|
| 6 | youkey Dual Camera Wireless Video Doorbell — Head-to-Toe View, 2K FHD Battery Doorbell with Local Storage No Monthly Fee, Package Detection, 5Ghz WiFi, Works with Alexa & Google Assistant, DB312 |
|
| 7 | Arlo Video Doorbell 2K (2nd Gen, Latest Release), Wireless or Wired Option, 2-Way Audio, Night Vision, Head to Toe Video View, Package Detection, Person & Vehicle Recognition, 1-Month Secure Plan |
|
| 8 | Blink Video Doorbell (newest model) – Head-to-toe HD view, two-year battery life, and simple setup. Sync Module Core included – System (Black) |
|
| 9 | Ring Video Wired Doorbell (newest model), Home or business security, Two-Way Talk, advanced motion detection, HD camera and real-time alerts to monitor your front door (wiring required) |
|
| 10 | Orbitell 1080p Wireless Wi-Fi Video Doorbell Camera with Two Way Audio, Night Vision, Cloud Storage, Smart AI Motion Detection, Support 2.4GHz Wi-Fi only |
|
- Power Disconnection: You must first locate and turn off power to your existing doorbell transformer at the circuit breaker. This is a non-negotiable safety step.
- Old Doorbell Removal: Unscrew and carefully disconnect the wires from your old doorbell button.
- Mounting the New Unit: Secure the mounting plate for your new video doorbell (e.g., Ring Video Doorbell Pro 2, Google Nest Doorbell (wired), Eufy Video Doorbell 2K) to the doorframe or wall. This often involves drilling pilot holes.
- Wiring Connection: Connect the existing low-voltage wires to the terminals on the new video doorbell. Polarity is often not critical for these devices, but always follow the manufacturer’s specific instructions. Some models may require a “chime kit” or “power kit” to be installed inside your existing indoor chime unit to regulate power.
- Securing the Doorbell: Attach the video doorbell unit to its mounting plate.
- Power Restoration & Setup: Turn the power back on at the breaker. The doorbell will power up, and you can then proceed with in-app setup, connecting it to your Wi-Fi network, and configuring settings like motion zones and alerts.
Challenges and Considerations for Wired Installation
- Existing Wiring Quality: Older wiring can be brittle or corroded, making connections challenging.
- Transformer Compatibility: Ensure your existing doorbell transformer meets the voltage requirements (typically 16-24VAC, 10-40VA). Some older transformers may be insufficient, requiring an upgrade.
- Chime Compatibility: Not all wired video doorbells work with all existing mechanical or digital chimes. Many require a power accessory or only support digital chimes via the app.
- Drilling and Tools: Requires a drill, screwdriver, and potentially a voltage tester.
- Professional Help: If no existing wiring or if uncomfortable with electrical work, professional installation adds to the cost but guarantees proper function and safety.
How Easy is Wireless Video Doorbell Installation in 2026?
Wireless video doorbell installation is significantly simpler for most homeowners, primarily because it bypasses any electrical wiring requirements. This makes them ideal for apartments, homes without existing doorbell wiring, or anyone seeking a quick, non-invasive setup.
The Wireless Installation Process: Step-by-Step
- Battery Charging: Fully charge the doorbell’s internal battery before installation. This can take several hours for models like the Arlo Essential Video Doorbell Wire-Free or Eufy Video Doorbell Dual.
- In-App Setup: Download the manufacturer’s app and follow the prompts to connect the doorbell to your home Wi-Fi network. This usually involves scanning a QR code or pressing a sync button.
- Mounting Location Selection: Choose an optimal mounting spot, ensuring good Wi-Fi signal strength and a clear view of your entryway. Use the app’s signal strength checker if available.
- Mounting the Unit: Secure the mounting plate to the wall or doorframe. This typically requires minimal drilling for screws, or in some cases, strong adhesive strips for temporary installations.
- Attaching the Doorbell: Clip or screw the doorbell unit onto its mounting plate. Ensure it’s securely fastened and, if applicable, use the provided security screw to prevent easy theft.
- Final Configuration: Adjust motion detection sensitivity, privacy zones, and notification preferences within the app.
Challenges and Considerations for Wireless Installation
- Battery Management: Requires periodic recharging, which means downtime for your doorbell. Frequency depends on activity levels.
- Wi-Fi Signal Strength: A strong, stable Wi-Fi connection at the doorbell’s location is paramount. Weak signals lead to delays, dropped connections, and missed events.
- Latency: Wireless models can sometimes have a slight delay in notifications or live view activation compared to wired units due to power-saving modes.
- Local Storage vs. Cloud: While many offer local storage options (e.g., Eufy), most still rely on cloud subscriptions for full feature sets and extended video history.
- Theft Risk: Battery-powered doorbells are generally easier to remove by thieves, though many include security screws and offer replacement programs.
Which Factors Truly Impact Video Doorbell Installation Difficulty?
Several critical factors dictate how easy or challenging your video doorbell installation will be, regardless of whether you choose a wired or wireless model.
Existing Infrastructure
This is the single most significant factor. If you have existing 16-24VAC doorbell wiring that is functional and correctly terminated, a wired installation becomes considerably simpler. If you have no wiring, a wireless doorbell is the only truly “easy” DIY option. Installing new wiring is a significant project, often requiring an electrician.
Your DIY Skill Level and Comfort
Are you comfortable handling low-voltage electrical connections, drilling into masonry or wood, and using a voltage tester? If so, wired installations are within reach. If not, a wireless, battery-powered unit is a safer and less stressful choice. Many people overestimate their comfort with electrical tasks until they’re faced with live wires.
Wi-Fi Network Strength and Coverage
Both wired and wireless video doorbells rely on your home Wi-Fi network. A weak signal at your front door can cripple performance, leading to dropped frames, delayed notifications, and unreliable live views. Consider your router’s location, the distance to the doorbell, and any signal obstructions. For homes with poor external Wi-Fi, a mesh Wi-Fi system like Google Nest Wifi Pro or TP-Link Deco BE85 is almost a necessity in 2026.
Smart Home Ecosystem Integration
While not directly impacting physical installation, integrating your doorbell into a broader smart home ecosystem (e.g., Apple HomeKit, Google Home, Amazon Alexa) can add layers of software complexity. Ensuring compatibility and seamless operation with other devices, like smart locks or security cameras, requires careful planning during setup, even if the physical mounting is simple.
Manufacturer Support and App Quality
A well-designed, intuitive app with clear installation instructions and responsive customer support can significantly smooth over any installation hurdles. Brands like Ring, Google Nest, and Arlo generally offer robust app experiences and extensive online resources.
Comparative Installation Factors: Wired vs. Wireless Video Doorbells
| Feature | Wired Video Doorbell (e.g., Ring Video Doorbell Pro 2) | Wireless Video Doorbell (e.g., Ring Battery Video Doorbell Plus) |
|---|---|---|
| Power Source | Existing low-voltage doorbell wiring (16-24VAC) | Rechargeable internal battery |
| Electrical Work Required | Yes (connecting to existing wires, potentially chime kit) | No (purely battery-operated) |
| Tools Needed | Drill, screwdriver, voltage tester, wire strippers (optional) | Drill, screwdriver |
| Typical Installation Time | 30-60 minutes (with existing wiring) | 15-30 minutes |
| Complexity Level | Moderate (basic electrical comfort needed) | Low (basic mounting) |
| Ideal Scenario | Homes with functional existing doorbell wiring | Homes without existing wiring, apartments, renters |
| Long-Term Maintenance | Minimal (no battery changes) | Periodic battery recharging (e.g., every 1-6 months) |
Key Considerations for a Smooth Video Doorbell Installation
- Check Your Wiring First: Before purchasing, confirm you have existing doorbell wiring and verify its voltage with a multimeter if unsure.
- Assess Wi-Fi Signal Strength: Use your phone to check Wi-Fi signal at your front door. A weak signal will cause issues regardless of doorbell type.
- Read the Manual (Seriously): Every model has specific installation nuances. The manual provides critical steps and safety warnings.
- Gather All Tools: Have your drill, screwdrivers, and any required accessories (e.g., angled mounting wedges) ready before you start.
- Plan for Chime Compatibility: If you want your indoor chime to ring, ensure your chosen wired doorbell supports your existing chime or plan for a compatible wireless chime.
- Consider Professional Installation: If you’re uncomfortable with electrical work or drilling into your home, hiring a professional can save time and prevent costly mistakes.
- Prioritize Safety: Always turn off power at the circuit breaker when working with wired doorbells.
Frequently Asked Questions
Can I install a wired video doorbell if I don’t have existing doorbell wiring?
Technically yes, but it’s a significant undertaking. It would involve running new low-voltage wiring from a transformer (which you’d also need to install, usually near an existing electrical outlet) to your front door. This often requires drilling through walls and potentially accessing your home’s electrical panel, making it a job best left to a qualified electrician.
How long does a wireless video doorbell battery typically last?
Battery life varies greatly by model and usage. High-traffic areas, frequent live views, extensive motion detection, and cold weather can significantly reduce battery life. Many current models, like the Ring Battery Video Doorbell Plus, advertise “up to 6 months” under optimal conditions, but real-world usage often sees 1-3 months before needing a recharge.
Do I need an indoor chime with a video doorbell?
Not necessarily. Both wired and wireless video doorbells send notifications directly to your smartphone or smart home devices (like Amazon Echo or Google Nest Hub). Many wireless doorbells also offer optional wireless chimes that plug into an outlet. If you prefer a traditional indoor chime, ensure your wired doorbell is compatible with your existing one, or purchase a separate wireless chime accessory.
What if my Wi-Fi signal is weak at my front door?
A weak Wi-Fi signal is a common issue. Consider upgrading to a mesh Wi-Fi system that extends strong coverage throughout your home and outdoors. Alternatively, you might use a Wi-Fi extender positioned closer to the front door. Some video doorbells (e.g., Arlo) also offer a base station that can be hardwired to your router, providing a more stable connection.
Is professional installation worth the cost for a video doorbell?
For wired video doorbells, especially if you lack existing wiring or are uncomfortable with electrical tasks, professional installation ensures correct and safe operation. For wireless models, it’s generally unnecessary unless you have complex mounting requirements or want seamless integration with a comprehensive smart home system.
Conclusion
When considering “Wired vs. Wireless Video Doorbells: Which Installs Easier?” in 2026, the answer is clear: wireless options offer superior ease of installation for the average DIYer, especially if no existing wiring is present. They require minimal tools and no electrical expertise, making them accessible to virtually anyone. Wired doorbells, while providing distinct performance advantages like continuous power and often more robust features, demand a more involved installation process that relies heavily on existing infrastructure and a basic comfort with electrical connections. Your ultimate choice should balance desired features, home infrastructure, and your personal DIY comfort level.
<!– Word count check:
TL;DR: 26
Intro H2: 37
H2 Core Differences: 135
H2 Wired Installation: 60
H3 Process: 109
H3 Challenges: 110
H2 Wireless Installation: 61
H3 Process: 115
H3 Challenges: 112
H2 Factors Impact: 40
H3 Infrastructure: 67
H3 Skill Level: 66
H3 Wi-Fi Strength: 85
H3 Smart Home: 76
H3 Manufacturer: 48
Table: 172 (counting words in cells, not just header/row)
H2 Key Considerations: 47
UL: 130
H2 FAQ: 18
H3 Q1: 67
H3 Q2: 80
H3 Q3: 90
H3 Q4: 77
H3 Q5: 75
H2 Conclusion: 97
Total: 26+37+135+60+109+110+61+115+112+40+67+66+85+76+48+172+47+130+18+67+80+90+77+75+97 = 1869. This is significantly over the 1550 hard cap.
I need to cut a lot. I will go through each section and shorten sentences, remove redundant phrases, and trim examples.
**RECOUNTING AND EDITING FOR CONCISENESS:**
TL;DR: 26 (Keep as is)
Intro H2: 37 (Keep as is)
H2 Core Differences:
Original: 135 words.
New: "The primary distinction is power and data. Wired doorbells use existing 16-24VAC wiring for continuous power. This enables 24/7 recording, faster response, and higher resolution without battery concerns. Data is Wi-Fi for both, but constant power allows robust chipsets. Wireless doorbells run on rechargeable batteries, ideal for homes without wiring. They connect via Wi-Fi and wake on motion or button press. Battery life varies from weeks to months (e.g., Ring Battery Video Doorbell Plus, Google Nest Doorbell battery)."
Count: 97 words. (Saved 38)
H2 Wired Installation:
Original: 60 words.
New: "Wired video doorbell installation is more involved, requiring basic electrical comfort. It hinges on existing low-voltage doorbell wiring. Without it, professional help or significant DIY electrical work is needed."